

Evaluating your TAP Block Injection
Is This Where I’m Supposed To Be?
TAP Blocks are EASY!! Well, they’re easy MOST of the time. There is the issue of the ‘not very solid’ structures to try to penetrate, and sometimes the target plane can be a significant distance from the surface. Oh yea, and don’t exert too much pressure with the 18 gauge Tuohy needle on this 90 year old patient with the 1mm wide Internal Oblique and Transversus Abdominus muscles and end up in her bowels! I would like to go on about how to overcome all of these issues, but today I am going to talk about another complicating issue that comes up when performing an Ultrasound-Guided TAP Block. What do you do when the ultrasound image becomes ‘blurry’ after you begin your injection?
Everything looks great! You easily recognize the plane between the Internal Oblique and Transversus Abdominus coming into view after rolling laterally from being over the oval-shaped anchoring landmark of the Rectus Abdominus muscle. The patient is calm and fully ‘anxiolysed’ and tolerated you numbing the skin and the track of local all the way down to your target. You quickly and easily identify your Tuohy needle and follow it toward your target, feeling the obvious ‘pop’ as you penetrate the bottom of the External Oblique. One ‘pop’ separates you from your goal, scores of adulation as we all watch the local dart across the screen like the proud smile on your face… and there will be plenty of time to grab a quick cup of coffee before your cases start for the day!
I think I felt it! Was that a ‘pop’? I slowed my needle speed a little just then, and I’m not sure if that was a ‘pop’ or not. Hmmm…pushing harder is just tenting the muscle downward. Maybe I’m through. Oh yea, I’m using ultrasound. I’ll just inject a cc or 2 and see if I’m in the right place or not! OK, they injected too slow. I didn’t see that very well. Let’s try again. Nope, I am definitely still in the bottom of the Internal Oblique, and this is going to be a pretty long incision, so it HAS to be within the plane! I’ll advance some more. Definitely a ‘pop’ that time! Oh, well, now I’m a little too far into the Transversus Abdominus muscle by the look of that injection. I’ll back up some and inject I guess. Now…well, it sort of looks right. There is swelling sort of around the place where there used to be a clear thick white line. Now that clear thick white line is gnarled and sort of everywhere, and it isn’t obvious that the local is spreading above or below or within the Transversus Abdominus Plane. Of course, this would also be the injection where we accidentally get air in the image as well, further obscuring my view!
What do you do? Do you just continue injecting, slip in the catheter and the patient ‘gets what he gets’? Do you completely start over? Do you keep fine-tuning your needle to see if you can get it to spread in a more recognizable pattern? What if you inject most or all of your local before you realize that only now do you have the needle properly placed? Do you tell someone to go get more local since you are finally definitely in the right place? Do you still have time for that? Because so much of it is in the muscle, do you have to start thinking about toxicity issues? Whatever you do, you DO need to know where your local went and how much is in the right place. You also want to make sure the catheter goes where it is supposed to go. You don’t want primary block success and secondary block failure, especially when you might be sending people home that you wouldn’t otherwise or with inpatients that have serious comorbidities and are undergoing severely painful procedures.
Sometimes, you can’t get the needle right where you want it, or a few confirmatory injections of local anesthetic distorts the local ‘architecture’ of the tissue. If you have done lots of TAP blocks, this has happened to you without question! You start with an awesome image, and end up with something like the image below.
This is one of the problems I have with Exparel. It is advertized as ‘set it and forget it’, but the ‘set it’ part is not always so straight forward (and I won’t get started here on the ‘and forget it’ part!)! Some of this injection may be well-placed and spread appropriately, but some of it will not. Is it 50/50? It is 20/80? With Exparel, what you get is what you get, and all injections are not equally well-placed. And there is no going back and fixing it afterward!
I always say that ultrasound should be used like a video, not just as a picture. The thin slice where the needle lies only gives you a very small view of what is happening within the tissues. If you are having trouble recognizing whether the spread is extending as it should, slide your probe to the ‘periphery of the spread’ where the architecture is still fully intact and visualize the spread from this location. You are starting from pristine architecture and visualizing the changes as you approach your injection site, and you will be able to see whether the local is going where you want it to go or not. Start from the pristine image and slide back toward your original position to see the changes that occur. This may be enough information for you to confirm that you are, in fact, in the correct position, and you can return to your bolusing process. [nonmember]
Register or login to view the full article.
[/nonmember]
[ismember]Keep the images that you saw in your mind, however, so that after you begin to inject later, you will know which black areas have gotten larger if there are more than one. You have likely added local where it is supposed to go as well as in places where it is not supposed to go, and you want to know which region is expanding. This will allow you to know whether you should stay where you are injecting or withdraw or advance your needle. Either way, return to the peripheral position and visualize the changes as you continue bolusing. You will want to see a thicker and thicker black line appear between the muscle layers as you continue to inject. This is proof that your bolus is within the plane and clearly spreading above (and below since you can slide to see this same change occur on the other side of your needle) your injection site. Leaving your catheter in the space you created should allow you to maintain the size of the ‘puddle’ of local anesthetic that you have just created. You can make adjustments to your needle if you begin to see that local is clearly amassing above of below your target, and this will allow you to salvage your nerve block. This technique of ‘watching from afar’ is worth performing even in situations where the spread is obvious from the start. It will give you a better idea of the breadth of your spread, and it is a good exercise to help you to recognize and appreciate more the 3-D anatomy from the 2-D image. You can do this with other nerve blocks as well! It will help you to recognize how far to the left and right of the beam that your local spreads with your individual technique.
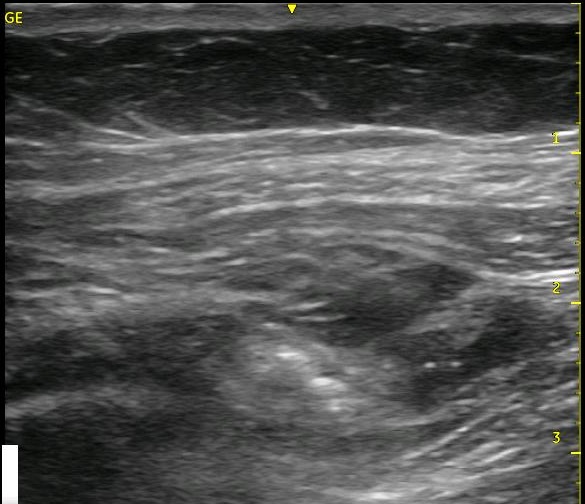
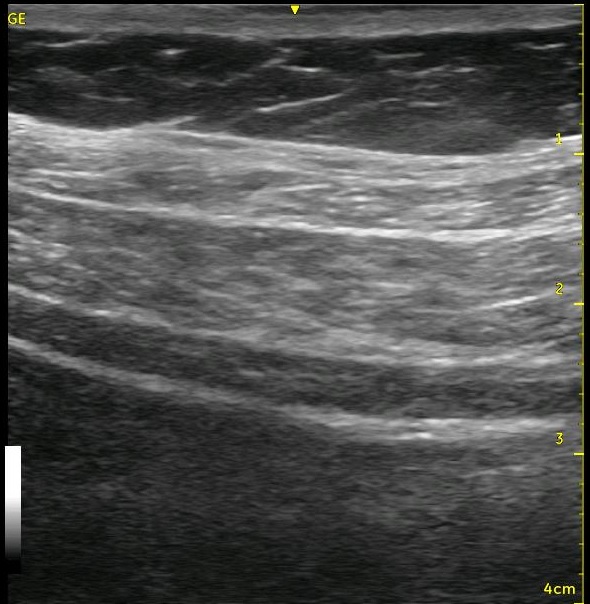
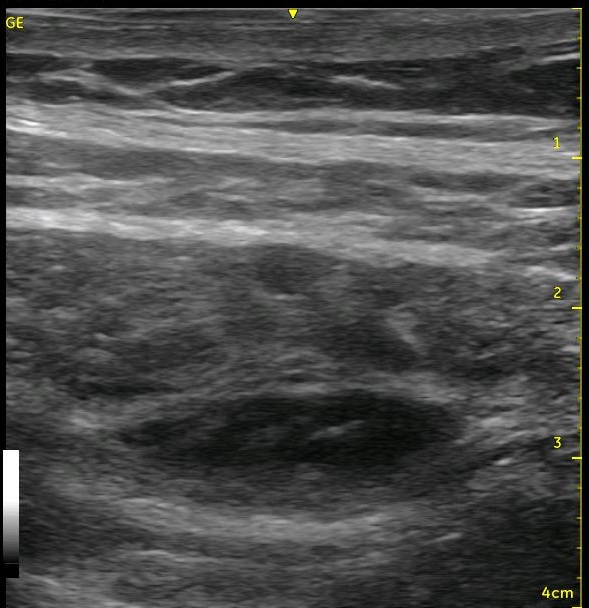
Look at the images below. They appear to be a series of pictures arranged from the beginning of an injection to the end. In fact, no further injection is added. The first image is taken at the periphery of a TAP block, and the subsequent images are taken as the probe is slid closer to the center of the injection. They confirm that the needle is adequately placed within the appropriate plane though the central position is a bit difficult to interpret.
The next two videos demonstrate how you can make these observations in real time during and after your injection to confirm your needle placement or to guide you to altering your final needle position. In the first video, you can see the ‘central image’ where the needle is placed, then we slide away, eventually revealing pristine architecture of the tissues, then we slide back to see how this image helps to define exactly where we are. The second short clip demonstrates the same scanning, but it moves to the far side, then it travels back across the center of the injection and continues in the opposite direction.
[/ismember]
See Also: TAP, Analgesia for Ex Lap, Back On Their Feet Again, Ultrasound Tip #3, TAP Block Pain Evaluation