FASCIA ILIACA
 I know I keep saying that this or that block is one of the ‘easy ones’, but this one really is another one of them. There are only a few simple essentials to identify on the image, and this block is also a good one to perform early as you are developing ultrasound skills and knowledge. Most of the time, adding ultrasound means learning a completely new needle orientation and entry site, but not with this block. There are several intermediate steps that can be taken along the way to help you as you learn to go to an ultrasound block with all blocks in general. This block, because it can be done the same way as the classic approach and because it has a significant ‘tactile’ component, may allow you a short-cut to integrating ultrasound into your practice. That is, you can perform the classic block as usual, but have the probe on the patient to view what you are expecting to feel and then to view the injection of local.
When I first started utilizing this block long ago, I used it primarily to help position elderly patients for a spinal who were presenting with a femur neck fracture for an ORIF of the hip. I would use the classic ‘2 pop’ technique with a single injection as soon as I got them in the holding room to give it time to set up for the procedure and to improve their analgesia. This made it much easier to position them without having to give them all the meds I was trying to avoid in the first place by doing a spinal.It won’t take all of their pain away, but it will do a great deal toward that end immediately and overnight with a single injection. This block for this indication is another good example of how the avoidance of opioids and their side-effects can be turned into not only a good patient experience, but also a way to optimize outcomes and minimize costs. There are a lot of unrecognized ‘soft costs’ that can be avoided when the elderly can avoid opioids.
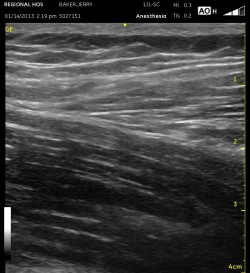
This block can be performed in a transverse or longitudinal orientation and as an in-plane or out of plane technique. I have found the longitudinal (probe beam going caudal to cranial) in-plane approach the quickest to identify and perform, so I use this approach the vast majority of the time. The transverse orientation is essentially like the Femoral Nerve Block (see tab above) described in another section but in a more cranial location. It is still the goal to deposit local anesthetic just deep to the fascia iliaca and above the iliacus muscle at this location just medial to the anterior superior iliac spine (ASIS).
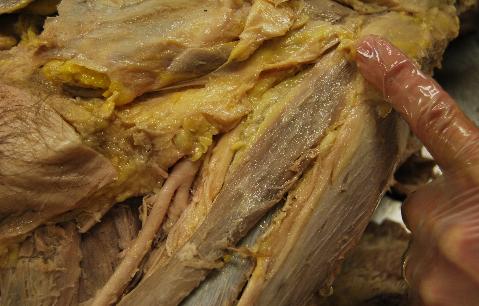
The cadaver image below identifies the ‘window’ in which the block is performed in either orientation. My finger is on the ASIS, and the sartorius muscle is at the tip of my finger extending down and to the left, passing the splitting femoral artery and femoral nerve on the medial aspect. The probe would sit just medial to this point going medially for the transverse approach, or it is turned ninety degrees to sit between the sartorius muscle and the femoral nerve. Deep to these structures is the ilium which is covered by our targets, the iliacus muscle and the overlying fascia iliaca.

I usually just find the ASIS, and put the probe just medial to it and make quick scans up/down and left/right to confirm my position then perform the block. The first structure to quickly identify on ultrasound is the bright steep (up and down)appearance of the ilium with its bone shadow below. The muscle immediately superficial to it extending out of the pelvis is the the iliacus. Roll the probe slightly to view the fascia iliaca at its brightest angle. Note from the cadaver image that a slice of the sartorius muscle may be overlying the iliacus on the caudal aspect and could be mistaken for the superficial aspect of the iliacus muscle. Move the probe slightly medially to get it out of the image.…
REGISTER for FREE to become a SUBSCRIBER or LOGIN HERE to see the full article!
See Also: Sartorius Muscle, Fascia Iliaca Tips, CPNB for AKA,Fascia Iliaca Tips #2, Recognizing Appropriate Fascia Iliaca Spread: Watch this Video!, CPNB for AKA, Ultrasound Tip #2

