

PARAVERTEBRAL
 This is not a block that you should cut your teeth on, but it is the one that, in my opinion, has the most dramatic impact on the recovery of my patients. It is just awesome to speak to a patient after a thoracotomy that can take a deep breath and cough easily and is preoccupied with their neck being uncomfortable or sore from the trauma and akward bandaging of a central line. If this is what they are focusing on, you have made a real difference. Develop your skills; attain consistency in your technique and a ‘feel’ for some of the other blocks, then start reading up on this one. When it is time to embark on paravertebral blocks, you are going to discover a real excitement and satisfaction in what you do! The recovery of the patients stands out prominently to others, and you will know that you’ve overcome one of the biggest challenges out there in the nerve block world, plus the successful endpoint of ‘pleural bowing’ on ultrasound is really cool!
There are two basic approaches to do this block, transverse and oblique paramedian (OPM). Each approach can be done with either an in-plane or out-of-plane needle entry. Breaking into this block might be best done with a thoracotomy so that, worst case, a small pneumothorax does not make a scene. It is a rare occurrence that is likely to be managed conservatively anyway, but having a chest tube planned may afford you a little more security as you get started. Doing these for outpatient breast surgery is something to start on a little later.
If you want to start by doing these at the end of the surgery while the patient is still asleep, your choice of approach won’t be a concern. For blocks performed ahead of surgery (my recommendation for several reasons), it is practical to start looking at the OPM approach first which I will describe below. This is so that you are able to keep away from the surgeon’s field since the entry and securing of the catheter for the transverse approach will likely be too far lateral. Getting around this by just doing a single shot transverse paravertebral block ahead of surgery will not be doing your patient much of a favor either as it will not last long enough. If you do prefer to do your first blocks with the transverse approach at the end of the case, do your first ones on the surgeon’s last case of the day so you don’t feel rushed and you don’t throw-off your turn-over times. [nonmember]…
REGISTER for FREE to become a SUBSCRIBER or LOGIN HERE to see the full article!
[/nonmember]
[wlm_ismember]
The OPM approach can be performed with needle entry in a cranial to caudal orientation or vice-versa. I know people that always do them cranial to caudal, but I find it ergonomically easier to do them from the opposite approach unless it is a low thoracic block (which I do typically for a nephrectomy). I typically do these blocks with the person in a seated position as for an epidural, but I found it easier to get started with the patient prone. Even for single injections (which I sometimes do for a mastectomy or lumpectomy), I still use an 18 gauge Tuohy needle for better visualization, to recognize tissue distraction better and to avoid the needle bending out of plane. I use a linear probe unless the patient is morbidly obese or I am doing a very high or very low thoracic block . The trapezius and rhomboid muscles make it a much deeper block high (mastectomy), and the thickness of the erector spinae muscles very low (nephrectomy) add the same issue. A linear probe is fine for a midthoracic block (thoracotomy).
Many people do mastectomies with three injections (like T1, T3, T5) to extend the volume to the farthest edges of the dermatomes that need to be covered. If you imagine a well-placed block that travels in a spindle formation (vs a dermatomal spread as with an intercostal block) up and down from the initial injection point, the farthest edges are likely to have the least volume of local anesthetic, especially as the local is taken up over time. I imagine that represents the first point (in time and location) where the patient begins to experience pain. Again, it is just amazing to me that a patient can go without opioids for two days after a radical mastectomy with lymph node dissection due to a single (multiple sites) injection! I believe that the multiple injection strategy allows us to deposit local at a greater concentration and volume distant to the central site of injection that would be used if only one site were chosen. Anecdotally, I have found that doing just two injections (like T2, T4) with a little more volume gives me the same results and allows me to save a few more minutes of time.
For a thoracotomy, I will usually choose a site for my catheter between the incision and chest tube insertion just one or two levels caudad to the thoracotomy site (maybe T7). This allows my infusion to catch both areas, but it stays closer to the more painful surgical trespass than the less painful one. Sometimes, a second catheter is necessary to adequately cover the chest tube insertion site. Make sure the catheter is inserted a few centimeters past the tip if you are using a multi-orifice catheter so that all of the local is infused below the SCTL. It is the same principal that I make with a femoral block and getting the catheter far enough under the fascia iliaca. I have adopted the use of soft tip catheters for this particular continuous block technique. This is because I think that a relatively steep angle toward the pleura and a particularly stiff catheter could puncture the pleura.
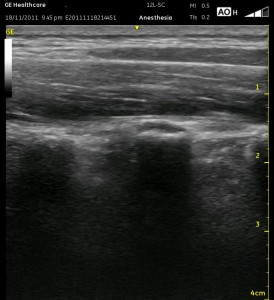
Once I have determined the sites for injection or injections, I start several centimeters laterally in a paramedian plane and follow the ribs medially. After identifying the bright shimmering white comet-tail appearance of the pleura moving with inspirations, watch for the rounded ribs to become more squared and shift slightly cranially. This is the transition from the rib to the transverse process. It can be a very subtle change. If you travel too far medially, the separated squared lines of the transverse process will become one jagged line representing the facet joints and laminae. In the series of images below (ribs, transverse processes then facet joints), the erector spinae muscles can be seen above the two layers of intercostal muscles. Cranial is to the right, and you can tell by the widening of the paravertebral space as you look from left to right.


Once you are appropriately over the transverse processes, angle the probe slightly medially (so that the beam is ‘looking’ laterally). This will allow the Superior Costotransverse Ligament (SCTL) to optimally (or at all) come into view. It is the bright white line just above the pleura in the images above. This is the critical element to recognize. This oblique maneuver is necessary to orient the probe to the ligament at a 90 degree angle because of the rounded nature of the ribs which are diving anterior (deep) as they approach each other at their posterior aspect at the spine. To see it at the most perpendicular angle, you must position the probe obliquely. As mentioned above, the SCTL will be seen going from deep to superficial as it goes caudal to cranial. That is because it attaches between the superficial aspect of the rib and the deep aspect of the transverse process cranial to it. Your goal is to put the needle just deep to the SCTL in the wedge-shaped darkened space just superficial to the pleura.
Remember to insert your needle in a path that matches the oblique tilt of the probe. There is usually a ‘pop’ sensation as you cross the SCTL. It is less prominent if you are too far lateral where the SCTL is contiguous with the less dense internal intercostal membrane, the medial continuation of the internal intercostal muscle. You will want to see the pleura bowing down (deep) in the interspace you are injecting as well as in the adjacent interspaces. If you are too far lateral, you will end up with either an intercostal block or maybe just a small degree of extension cranially and caudally. Whenever I believe this is the case, and it has been a struggle just to get the needle in the correct plane, I will turn my Tuohy bevel 90 degrees toward the spine with the thought that I may be able to make it slide medially instead of laterally. I can’t say that I know if this has been helpful or not, however.
It is always important to make sure your assistant knows to inject without excessive pressure, but it is even more important with this block as this can lead to epidural or intrathecal spread and significant hypotension or worse. It is probably more likely with the transverse approach as the needle will be pointing almost directly toward the intervertebral foramen with this needle orientation. Be sure to scan cranially and caudally after your injection to confirm your success.
Watch the following videos which scan from both approaches. The first video demonstrates the oblique paramedian approach. After tracking in a caudal then cranial direction, the probe moves medially. The trapezius muscle comes into view as the probe moves medially. This change is more prominent higher in the thoracic spine. Note the ‘gap’ to the left which is the paravertebral space. Left is the cranial direction. The next video demonstrates the transverse approach. As it scans in a cranial and caudal direction, the transverse process can be seen casting a shadow below it. As it does so, note that at the same time, the rib (more superficial than the pleura) begins to come into view. The shimmering appearance of the pleura is unmistakable. The SCTL is present at the medial aspect, and the target for the needle is the dark band above the pleura near the point where the transverse process comes into view.
[/wlm_ismember]
See Also: Ultrasound Tip #2